CUEBiC TEC BLOG

キュービックTECチームの技術ネタを投稿しております。

Terraformのdynamicブロックを使って動的にリソースパラメーターを分けてみた

概要

こんにちは、キュービックでSREをやっているYuhta28です。キュービック内のテック技術について発信します。
以前弊社でのTerraformの取り組みについて紹介しました。

cuebic.hatenablog.com

この中で環境によってリソース数の差分が生じる、例えば本番環境なら冗長化のためNAT Gatewayを3台稼働させるが、検証環境ならコスト最適化のため1台のみ稼働させると言ったケースではfor_eachを使って動的にリソース数を管理する方法について紹介しました。
ではAWS CodePipelineで本番環境のみにApprovalステージを追加したいというような要望のときはどうすればよろしいでしょうか🤔

本番環境ではデプロイ直前に承認作業がある

CodePipelineのステージはパラメーターの一つで複数行に渡り記述されるのでfor_eachで分岐するとなるとうまくいきません。

# CodePipeline作成Terraform(一部パラメーター省略)
resource "aws_codepipeline" "example-pipeline" {
  artifact_store {
    location = var.s3-location
    type     = "S3"
  }
  name     = "pipeline-name"

  # ソースステージ
  stage {
    name = "Source"
    action {
      category = "Source"

      configuration = {
        Branch               = "main"
        Owner                = "master"
        PollForSourceChanges = "false"
        Repo                 = "pipeline-repo"
      }

      name             = "Source"
      namespace        = "SourceVariables"
      output_artifacts = ["SourceArtifact"]
      owner            = "ThirdParty"
      provider         = "GitHub"
      region           = "ap-northeast-1"
      run_order        = "1"
      version          = "1"
    }
  }

  # ビルドステージ
  stage {
    name = "Build"

    action {
      category = "Build"

      configuration = {
        ProjectName = "build-project"
      }

      input_artifacts  = ["SourceArtifact"]
      name             = "Build"
      output_artifacts = ["BuildArtifact"]
      owner            = "AWS"
      provider         = "CodeBuild"
      region           = "ap-northeast-1"
      run_order        = "1"
      version          = "1"
    }
  }

  # 承認ステージ(本番環境のみ作成)
  stage {
      name = "Confirm"
      action {
        category  = "Approval"
        name      = "RequestApprove"
        owner     = "AWS"
        provider  = "Manual"
        region    = "ap-northeast-1"
        run_order = "1"
        version   = "1"
      }
  }

  # デプロイステージ
  stage {
    name = "Deploy"

    action {
      category = "Deploy"


      input_artifacts = ["BuildArtifact"]
      name            = "Deploy"
      owner           = "AWS"
      provider        = "ECS"
      region          = "ap-northeast-1"
      run_order       = "1"
      version         = "1"
    }
  }
}

承認ステージ部分が本番環境だけに必要なステージです。ここだけを環境ごとに分割したいという状況は一般的にあると思います。
この問題を解決してくれるのがdynamicブロックとよばれるものです。今回このdynamicブロックを用いて環境毎に異なるリソースパラメータの動的作成について紹介します。

dynamicブロックについて

www.terraform.io

dynamicはブロック単位のループ処理を実装したいときに使います。
例えばセキュリティグループの作成でdynamicブロックを使ったとします。

# セキュリティグループ作成
locals {
  ingress_web = [
  # [description, from_port, to_port, protocol, cidr_blocks]
    ["HTTPS from VPC", 443, 443, "tcp", "10.0.0.0/8"],
    ["HTTP from VPC", 80, 80, "tcp", "192.168.0.0/16"],
  ]
}

resource "aws_security_group" "web" {
  name        = "allow-web"
  vpc_id      = aws_vpc.main.id

  dynamic "ingress" {
    for_each = local.ingress_web
    content {
      description = ingress.value[0]
      from_port   = ingress.value[1]
      to_port     = ingress.value[2]
      protocol    = ingress.value[3]
      cidr_blocks = ingress.value[4]
    }
  }

  egress = [
    {
      from_port        = 0
      to_port          = 0
      protocol         = "-1"
      cidr_blocks      = ["0.0.0.0/0"]
    }
  ]

  tags = {
    Name = "allow-web"
  }
}

ここではingressルールでHTTP通信とHTTPS通信の許可設定を付与する箇所でdynamicブロックを使っています。ingressのパラメータはポートが異なっても設定項目は同じなので設定値をingress_webという変数でまとめればingressの記述回数が一回で済みます。
これを応用してdynamicでループするかどうかをTrue or Falseで分岐するようにすれば本番環境のみに承認ステージを追加することができます。

dynamicブロックによる分岐設定

先程のTerraformファイルを以下のように修正します。

# CodePipeline作成Terraform(一部パラメーター省略)
resource "aws_codepipeline" "example-pipeline" {
  artifact_store {
    location = var.s3-location
    type     = "S3"
  }
  name     = "pipeline-name"

  # ソースステージ
  stage {
    name = "Source"
    action {
      category = "Source"

      configuration = {
        Branch               = "main"
        Owner                = "master"
        PollForSourceChanges = "false"
        Repo                 = "pipeline-repo"
      }

      name             = "Source"
      namespace        = "SourceVariables"
      output_artifacts = ["SourceArtifact"]
      owner            = "ThirdParty"
      provider         = "GitHub"
      region           = "ap-northeast-1"
      run_order        = "1"
      version          = "1"
    }
  }

  # ビルドステージ
  stage {
    name = "Build"

    action {
      category = "Build"

      configuration = {
        ProjectName = "build-project"
      }

      input_artifacts  = ["SourceArtifact"]
      name             = "Build"
      output_artifacts = ["BuildArtifact"]
      owner            = "AWS"
      provider         = "CodeBuild"
      region           = "ap-northeast-1"
      run_order        = "1"
      version          = "1"
    }
  }

  # dyanmicを追加、論理型変数でTrue時のみリソースを作成する
  dynamic "stage" {
    for_each = var.production_approval ? [1] : []
    content {
      name = "Confirm"
      action {
        category  = "Approval"
        name      = "RequestApprove"
        owner     = "AWS"
        provider  = "Manual"
        region    = "ap-northeast-1"
        run_order = "1"
        version   = "1"
      }
    }
  }

  # デプロイステージ
  stage {
    name = "Deploy"

    action {
      category = "Deploy"


      input_artifacts = ["BuildArtifact"]
      name            = "Deploy"
      owner           = "AWS"
      provider        = "ECS"
      region          = "ap-northeast-1"
      run_order       = "1"
      version         = "1"
    }
  }
}

dynamicブロックを追加し、production_approvalという変数がTrueの時リソースを一回作成するように設定します。
production_approvalはTrue/Falseの論理型変数なので、variables.tfには以下のように記載します。

# variables.tf
variable "production_approval" {
  type        = bool
  default     = false
  description = "本番環境のみにApprovalステージを設定するためのif分岐"
}

本番環境のterraform apply実行先のCodePipelineモジュールファイルにtrueを加えます。

module "cba-codepipeline" {
  source              = "../../modules/codepipeline

~~~~~~~~~~~~~~~~~~~~~~~~~~~~~~~~
   
  # trueとすることでfor_eachで承認ステージを作成する
  production_approval = true
}

これによって本番環境では承認ステージ付きのCodePipelineが作成され、検証環境では承認ステージなしのCodePipelineを作成できます。
(注:production_approvalのデフォルト値をfalseにしているので検証環境に変数をセット不要です)

所感

dynamicブロックを使ってCodePipelineの承認ステージの作成可否を環境ごとに分岐できるようにしました。
Moduleで汎用化する際、パラメータ単位でリソースを作り分けたいというケースもあると思います。そうしたケースではdynamicブロックを使って環境別の条件別分岐を実装すると良いと思います。
みなさんもぜひ試してみてください。

参考文献

future-architect.github.io

stackoverflow.com

kleinblog.net

関連記事

Terraformに関連する記事はこちらもご覧ください。

cuebic.hatenablog.com

herp.careers

スイッチURLの管理からサヨウナラ、AWS Extend Switch Rolesを使ってみた

概要

こんにちは、キュービックでSREをやっているYuhta28です。キュービック内のテック技術について発信します。
以前弊社で運用しているAWSマルチアカウントについて記事にしました。

cuebic.hatenablog.com

この時、複数のアカウントへのスイッチURLを管理しようとすると結構管理が面倒になるときがあります。ロール履歴では最大5つまでのスイッチ履歴が保存されるので5個までのAWSアカウントでしたら問題はありませんが、それ以上増えるとなるとスイッチ先のAWSアカウントとIAMロールARNを指定する必要があります。

スイッチURLをドキュメントに一覧化してスイッチしたいアカウントのURLを参照するという方法もありますが、毎回ドキュメントページまで行くのが個人的にはおっくうだと思っています。何か方法はないかなと思い調べてみましたが、AWS Extend Switch RolesというGoogle Chromeアプリを使うことでスイッチURLを簡単にできることがわかりましたので、AWS Extend Switch Rolesを使ったスイッチURL管理について紹介いたします。

AWS Extend Switch Roles

chrome.google.com

上記のChrome ウェブストアからAWS Extend Switch Rolesをインストールします。
インストール後、アドオンに追加されていますのでConfiguration画面へ移行します。

Configuration画面では、~/.aws/configファイルで記述するするprofileブロックと同様にスイッチ先のアカウントIDやスイッチIAMロール名、移行先のデフォルトリージョンなどを指定します。

全部モザイクですとわかりにくいのでサンプルコードを置いておきます。

[SwitchA]
aws_account_id = 012345678910
role_name = SwitchARole
region = ap-northeast-1
color = 6f1603

[SwitchB]
aws_account_id = 123456789100
role_name = SwitchBRole
region = ap-northeast-1
color = 220259

[SwitchC]
aws_account_id = 234567891001
role_name = SwitchCRole
region = ap-northeast-1
color = f7efee

[SwitchD]
aws_account_id = 345678910012
role_name = SwitchDRole
region = ap-northeast-1
color = d29665

color部分はカラーコードを記載すれば色の変更ができますので、画面下から好みの色のカラーコードを生成してペーストしてください。

AWSコンソール画面でExtend Switch Rolesのアイコンをクリックするとスイッチロールリストが表示されます。

所感

AWS Extend Switch Rolesを使ったスイッチURLの切替方法について紹介しました。最初は一つのAWSアカウントからプロダクトを始めても事業が成長すると複数のAWSアカウントを利用するようになると思います。
そのときにこのアカウントのスイッチURLってなんだっけ?切り替えの煩わしさを少しでも減らせれば開発効率も上がると思います。Chromeアプリ版を紹介しましたが、Firefoxアドオン版もありますのでFirefoxユーザーも気になりましたらぜひチェックしてみてください。

addons.mozilla.org

参考文献

https://dev.classmethod.jp/articles/try-aws-extend-switch-roles-v2-pre-release/
https://dev.classmethod.jp/articles/introduction-aws-extend-switch-role/

ターミナルで完結!便利なGit運用 Tipsを紹介してみた

概要

こんにちは、キュービックでSREをやっているYuhta28です。キュービック内のテック技術について発信します。
皆さんはGit開発する際、ターミナルでgitコマンド実行後GitHubのサイトを訪れてPRしマージされますでしょうか。そしてマージした後またローカルに戻ってgit pullでローカルブランチも最新にしていますか🤔
せっかくターミナルで操作しているのに途中でブラウザ操作が入るのは個人的には面倒だと感じています。git pushした後の操作も全てターミナルで完結すればブラウザ切り替えする手間も減らせて煩わしさが減ると思いませんか。
ローカルのリポジトリもバラバラにgit clone するとあのリポジトリどこだっけ?となり探すのがこれまた面倒になります。
今回GitHub上の操作をターミナルで実現できるGitHub CLIコマンドの紹介とghq、pecoを使った快適なリポジトリ管理を紹介していきます。

GitHub CLIについて

cli.github.com

GitHub CLIは2020年にバージョン1系がリリースされ、昨年8月にバージョン2系がリリースされたGitHub操作をターミナル上で実現するためのOSSになります。
GitHub CLIをインストールすることで前述のgit push以降のGitHub操作をターミナルから操作できるようになりシームレスなGit運用ができるようになります。バージョン2では拡張コマンド機能が追加され、よりカスタマイズされた操作ができるようになりました。(今回拡張コマンドを使うことはないので詳細な說明は割愛いたします)

インストール

概要はこのくらいにして早速インストールしていきます。MacでしたらHomebrewからインストールできます。

brew install gh

その他にも多くのパッケージマネージャ経由でインストールできますので、GitHubのREADMEページをご覧ください。

github.com

初期設定

インストールできましたらGitHub CLIの認証を行います。 SSHGitHubに接続されていましたらローカルのSSH秘密鍵GitHub CLIに認証させます。HTTPで接続されていましたらトークン値を貼り付けましょう。

gh auth login
$ gh auth login
? What account do you want to log into? GitHub.com
? What is your preferred protocol for Git operations? SSH
? Upload your SSH public key to your GitHub account? Skip
? How would you like to authenticate GitHub CLI? Paste an authentication token
Tip: you can generate a Personal Access Token here https://github.com/settings/tokens
The minimum required scopes are 'repo', 'read:org'.
? Paste your authentication token:
~~~~~~省略~~~~~~

認証が通りましたらGitHubアカウントとしてGitHub CLIが使えるようになります。

$ gh auth status
github.com
  ✓ Logged in to github.com as XXXXXXXXXX (/Users/XXXXXXXXXX/.config/gh/hosts.yml)
  ✓ Git operations for github.com configured to use ssh protocol.
  ✓ Token: *******************

Goインストール

このあと紹介するghqもpecoもGo製のOSSなので事前にGoをインストールする必要があります。MacでしたらHomebrewでインストールできますので事前にインストールします。

brew install go

ghqについて

github.com
ghqとはリポジトリ管理を楽にするコマンドラインツールでGo製のOSSです。GitHubリポジトリをローカルにクローンする場合、git cloneを実行したディレクトリ直下にローカルリポジトリが作成されます。
もし適当なディレクトリにクローンして管理するとどこにローカルリポジトリがあるのか探すのが大変ですし、ローカルにリポジトリをクローンし過ぎるとあっという間にローカルリポジトリの数は膨れ上がります。ghqとこのあと紹介するpecoを組み合わせることで、目的のリポジトリに瞬時に移動できます。

インストール

brew install ghq

pecoについて

github.com
pecoも先述のとおりGo製のOSSです。インタラクティブgrepツールでghqと組み合わせれば強力なリポジトリ管理ツールになります。

インストール

brew install peco

初期設定

2つをインストールできましたらまずは使用感について試しておきましょう。
ghq get <リモートリポジトリURL>GitHubリポジトリをローカルにクローンすることができます。クローン先はデフォルトでは$HOME/ghqですが、git configでクローン先を変更できます。

git config --global ghq.root '~/go/src' #~/go/srcディレクトリ直下にリポジトリを取得

取得したリポジトリghq listで一覧化できます。

$ ghq list
github.com/aws/aws-health-tools
github.com/cuebic/XXXXXXXXXXXXXXXX
github.com/iann0036/former2

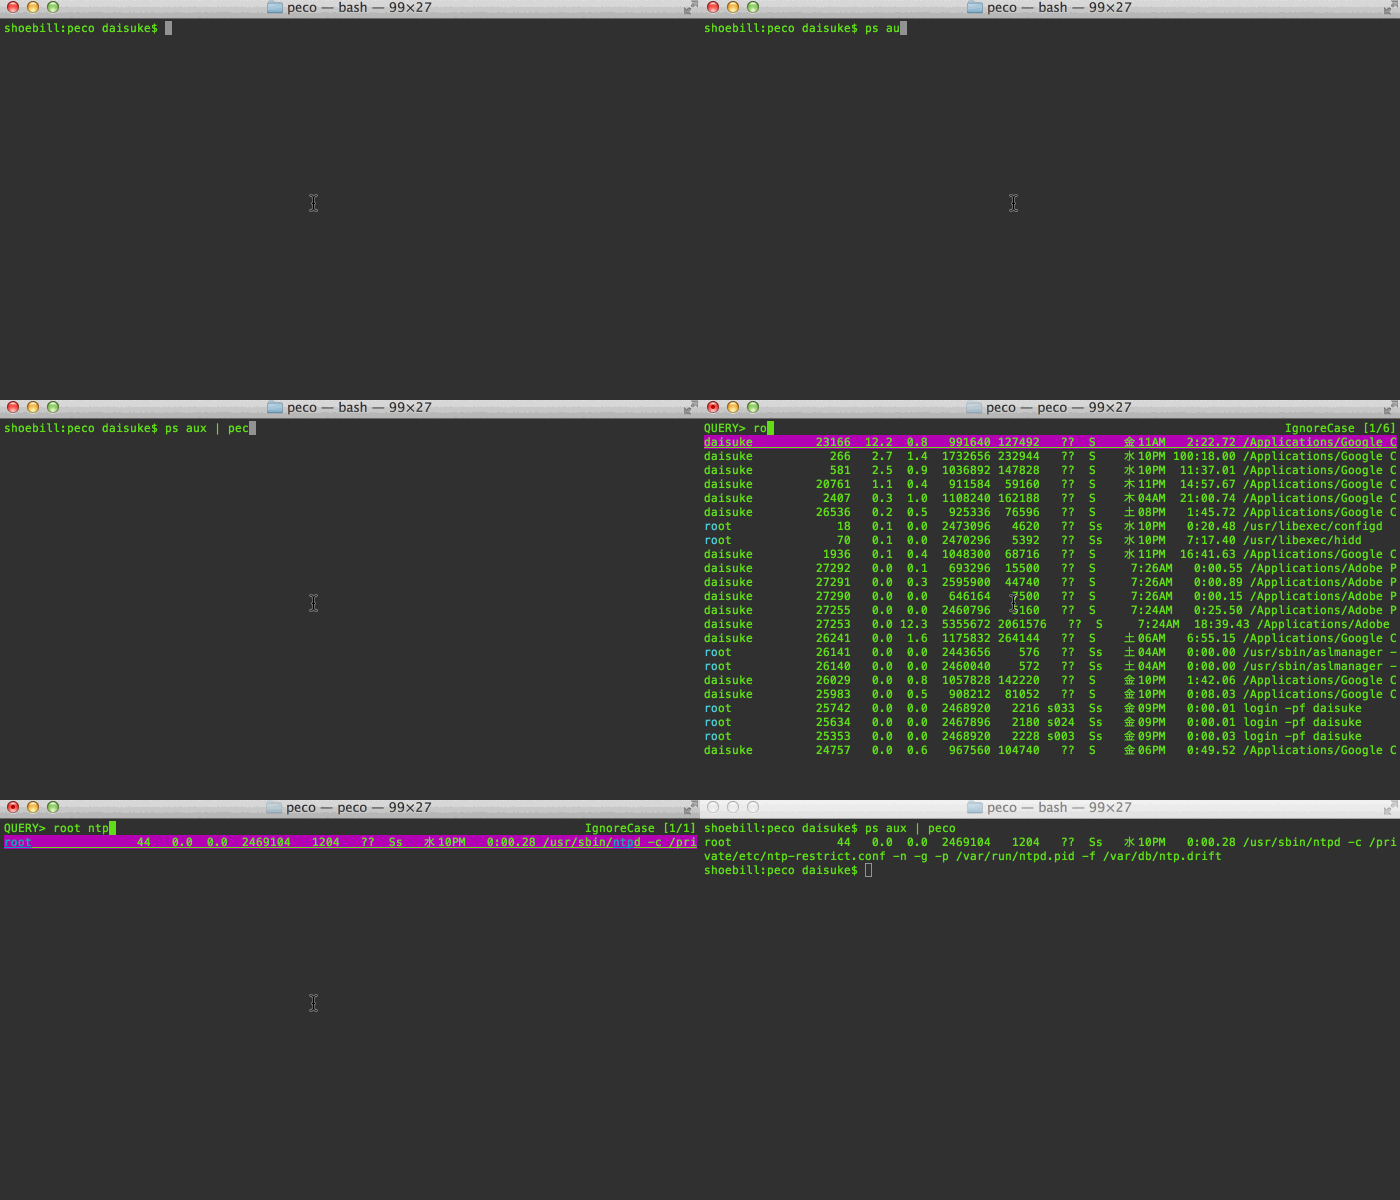
続いてpecoも試しておきましょう。pecoはパイプで前のコマンドの結果を渡すことで真価を発揮します。

Executed `ps -ef | peco`, then the query `root` was typed. This shows all lines containing the word root GitHub READMEから引用

エイリアスコマンド作成

ghqとpecoの動作確認が完了しましたらこの2つを組み合わせたワンライナーコマンドを作成し、シェルの読み込みファイルに記載します。

# .zshrc

# ghq+peco
alias ghcd='cd $(ghq root)/$(ghq list | peco)'

記載しましたらsourceコマンドで読み込みます。

source ~/.zshrc

実行結果

$ ghcd

QUERY>
github.com/cuebic/XXXXXXXXXXXXXXXX

ターミナル操作

必要な準備は完了しました。これでどのように変わるでしょうか。
試しに新しいOSSリポジトリをローカルに落としたい場合は、git cloneからghq getに変わります。

$ ghq get git@github.com:github/gitignore.git
     clone ssh://git@github.com/github/gitignore.git -> /Users/ghq/github.com/github/gitignore
       git clone --recursive ssh://git@github.com/github/gitignore.git /Users/ghq/github.com/github/gitignore
Cloning into '/Users/ghq/github.com/github/gitignore'...
remote: Enumerating objects: 9730, done.
remote: Counting objects: 100% (6/6), done.
remote: Compressing objects: 100% (6/6), done.
remote: Total 9730 (delta 0), reused 4 (delta 0), pack-reused 9724
Receiving objects: 100% (9730/9730), 2.30 MiB | 2.16 MiB/s, done.
Resolving deltas: 100% (5288/5288), done.

ghcdですぐにローカルにクローンしたリポジトリに移動できます。

$ ghcd
QUERY>                                                  
github.com/github/gitignore

そして、ローカルリポジトリの編集が完了し、リモートリポジトリにコミットしてマージする場合もターミナル内で全て完結できます。

# リモートリポジトリへのaddからpush作業
$ git add .

$ git commit -m "fix"
[feature/add-gitops-article 37cb79b] fix
 2 files changed, 55 insertions(+), 6 deletions(-)

$ git push origin feature/add-gitops-article
Enumerating objects: 14, done.
Counting objects: 100% (14/14), done.
Delta compression using up to 8 threads
Compressing objects: 100% (7/7), done.
Writing objects: 100% (8/8), 61.15 KiB | 15.29 MiB/s, done.
~~~~~~~~~~~~~~~~~~~~~~~~~~~~~~~~~~~~~~~~~~~~~~~~~~~~~~~~~~~~~
 * [new branch]      feature/add-gitops-article -> feature/add-gitops-article

 # mainブランチへのPRからマージ作業
$ gh pr create

Creating pull request for feature/add-gitops-article into main in cuebic/XXXXXXXXXXXX

? Title fix
? Body <Received>
? "What's next? Submit"
https://github.com/cuebic/XXXXXXXXXXXX/pull/19

$ gh pr status

Relevant pull requests in cuebic/XXXXXXXXXXXX

Current branch
  #19  fix [feature/add-gitops-article]

Created by you
  #19  fix [feature/add-gitops-article]

Requesting a code review from you
  You have no pull requests to review

$ gh pr merge
? What merge method would you like to use? Create a merge commit
? Delete the branch locally and on GitHub? Yes #マージ後にローカルブランチを削除するか選択
? "What's next? Submit"
✓ Merged pull request #20 (feature/add gitops article)
remote: Enumerating objects: 2, done.
remote: Counting objects: 100% (2/2), done.
remote: Compressing objects: 100% (2/2), done.
Unpacking objects: 100% (2/2), 1.24 KiB | 633.00 KiB/s, done.
remote: Total 2 (delta 0), reused 0 (delta 0), pack-reused 0
From ssh://github.com/cuebic/XXXXXXXXXXXX
 * branch            main       -> FETCH_HEAD
   43e72c6..016f5bd  main       -> origin/main
Updating 43e72c6..016f5bd
Fast-forward
 entry/2022/05/17/122008.md | 101 ++++++++++++++++++++++++++++++++++++++++++++++++++++++++++++++++++-----
 1 file changed, 95 insertions(+), 6 deletions(-)
✓ Deleted branch feature/add-gitops-article and switched to branch main #ローカルのブランチを削除

所感

ご覧のようにgit addからGitHubリポジトリのマージまで全てターミナル上で完結しました。今までは毎回ローカルでgit pushした後にGitHubのサイトを開いて、PRを作成しマージする必要がありました。ターミナルからその操作を全て完結すればストレスフルなGit開発ができると思いますのでみなさんもぜひ試してみてください。

参考文献

zenn.dev

qiita.com

マルチアカウントでTerraform運用を実践してみた

概要

こんにちは、キュービックでSREをやっているYuhta28です。キュービック内のテック技術について発信します。

以前の記事にて、弊社のAWSマルチアカウント運用について紹介しました。今回はマルチアカウント配下にて活用しているTerraformの運用について紹介いたします。

Terraform

www.terraform.io Terraformを使ったインフラリソースのコード化事例は数多く世の中に出回っています。

ですが、Terraformを使ったIaC管理は各社ごとに方法は様々で数多くの運用方法が紹介されています。というのもTerraformのバージョンがGA(Generally Available)リリースされたのが2021年6月以降で、バージョンアップのたびに機能の非互換性で動かなくなるという問題もありました。

そのため当時のTerraformのバージョンでは問題なくても、今では非推奨といった事例もあります。そのうえキュービックではコンソール画面から作成された既存のAWSリソースが数多くあります。なので、既存インフラリソースをまずはIaCで管理できるようにするところから始めました。

ディレクトリ構成

弊社でのTerraformのディレクトリ構成以下の通りです。

$ tree
.
├── README.md
├── env
│   ├── prd
│   │   ├── README.md
│   │   ├── ec2.tf
│   │   ├── ecs.tf
│   │   ├── efs.tf
│   │   ├── ga.tf
│   │   ├── iam.tf
│   │   ├── main.tf
│   │   ├── rds.tf
│   │   └── vpc.tf
│   └ ── sandbox
│      ├── README.md
│      ├── ec2.tf
│      ├── ecs.tf
│      ├── efs.tf
│      ├── iam.tf
│      ├── main.tf
│      ├── rds.tf
│      └── vpc.tf
|
└── modules
    ├── ec2
    │   ├── alb.tf
    │   ├── asg.tf
    │   ├── ec2.tf
    │   ├── eip.tf
    │   ├── output.tf
    │   ├── sg.tf
    │   └── variables.tf
    ├── ecs
    │   ├── main.tf
    │   └── variables.tf
    ├── efs
    │   ├── main.tf
    │   └── variables.tf
    ├── ga
    │   ├── main.tf
    │   └── variables.tf
    ├── iam
    │   ├── main.tf
    │   ├── output.tf
    │   └── variables.tf
    ├── rds
    │   ├── main.tf
    │   └── variables.tf
    └── vpc
        ├── main.tf
        ├── outputs.tf
        └── variables.tf

いわゆるModuleを使った環境ごとのリソース管理になります。Terraformのリソースはmodulesディレクトリで共通化し、差異のある部分を変数として外だします。

envディレクトリ以下の環境ごとのディレクトリで各種リソースのモジュールを宣言し、そこに変数をあてはめることで、Terraformで管理していきます。

Terraformの実行環境ですが、sandbox(検証)環境のEC2インスタンス内で実行することにしました。これにより各種リソースの権限をIAMロールとしてEC2にアタッチさせるだけで実現できますので、認証情報の管理が楽になります。本番環境のAWSリソース作成に関しましては、以前の記事でも説明したAssume Role1を使ってEC2インスタンスに本番環境へのAWSリソース作成権限を渡しています。

provider "aws" {
  region = "ap-northeast-1"
  assume_role {
    role_arn  =  "arn:aws:iam::XXXXXXXXXXXXXXXXX:role/Terraform-Prd-Switch"
  }
}

moduleについて

www.terraform.io

モジュールとは複数のインフラリソースをまとめたテンプレートみないものです。Terraformのレジストリ上に公式や個人が作成したモジュールが公開されていて自由に活用できます。

ですが、今回新規で作るというよりかは既存のAWSリソースをTerraformで管理する必要がありましたので、terraform importでリソースをインポートし自作のモジュールの中に管理することにしました。

moduleディレクトリはその中にリソース別のディレクトリを作成し、Terraformの設定ファイルを作成しています。

VPCの例

例としてVPCAWSリソースをTerraformで管理したい場合について說明します。 まずvpcディレクトリ配下のmain.tfの中身はこのようになっています。

# main.tf
resource "aws_vpc" "terraform-vpc" {
  cidr_block = var.cidr_block
  tags = {
    Name           = "terraform-${var.Tag_Name}-vpc"
    Terraform      = "True"
    CmBillingGroup = "terraform:${var.Tag_Name}"
  }
}

resource "aws_internet_gateway" "terraform-igw" {
  vpc_id = aws_vpc.terraform-vpc.id
  tags = {
    Name           = "terraform-${var.Tag_Name}-igw"
    CmBillingGroup = "terraform:${var.Tag_Name}"
    Terraform      = "True"
  }
}


resource "aws_subnet" "terraform-public-subnet" {
  for_each          = var.public-AZ
  vpc_id            = aws_vpc.terraform-vpc.id
  cidr_block        = each.value
  availability_zone = "ap-northeast-1${each.key}"
  tags = {
    Name           = "terraform-${var.Tag_Name}-public-subnet-${each.key}"
    CmBillingGroup = "terraform:${var.Tag_Name}"
    Terraform      = "True"
  }
}

resource "aws_subnet" "terraform-private-subnet" {
  for_each          = var.private-AZ
  vpc_id            = aws_vpc.terraform-vpc.id
  cidr_block        = each.value
  availability_zone = "ap-northeast-1${each.key}"
  tags = {
    Name           = "terraform-${var.Tag_Name}-private-subnet-${each.key}"
    CmBillingGroup = "terraform:${var.Tag_Name}"
    Terraform      = "True"
  }
}

resource "aws_nat_gateway" "terraform-nat" {
  for_each      = toset(var.eip-NAT-AZ)
  allocation_id = aws_eip.terraform-nat-eip[each.key].id
  depends_on    = [aws_internet_gateway.terraform-igw]
  subnet_id     = aws_subnet.terraform-public-subnet[each.key].id
  tags = {
    Name           = "terraform-${var.Tag_Name}-nat-${each.key}"
    CmBillingGroup = "terraform:${var.Tag_Name}"
    Terraform      = "True"
  }
}

resource "aws_eip" "terraform-nat-eip" {
  for_each = toset(var.eip-NAT-AZ)
  tags = {
    Name      = "terraform-${var.Tag_Name}-nat-${each.key}"
    Terraform = "True"
  }
}

resource "aws_route_table" "terraform-public-rt" {
  vpc_id = aws_vpc.terraform-vpc.id
  tags = {
    Name           = "terraform-${var.Tag_Name}-public-rt"
    CmBillingGroup = "terraform:${var.Tag_Name}"
    Terraform      = "True"
  }
}

resource "aws_route_table" "terraform-private-rt" {
  for_each = toset(var.private-rt)
  vpc_id   = aws_vpc.terraform-vpc.id
  tags = {
    Name           = "terraform-${var.Tag_Name}-private-rt-${each.key}"
    CmBillingGroup = "terraform:${var.Tag_Name}"
    Terraform      = "True"
  }
}

CIDRブロックやネーミングタグ部分など環境ごとに差異が生じる部分を変数として外だしています。Terraformで変数を使うときはvariables.tfなど別のTerraform設定ファイルで宣言しておけばファイルの可読性が低下せずに済みます。

# variables.tf
variable "Tag_Name" {
  type        = string
  description = "Tag"
}

variable "cidr_block" {
  type        = string
  description = "vpcのサブネットです"
}

~~~~~~~~~省略~~~~~~~~~

そしてenvディレクトリの環境別に存在するvpc.tfVPCのモジュールを宣言し変数を代入します。

# env.tf
module "terraform-vpc" {
  source     = "../../modules/vpc"
  Tag_Name   = "Dev"
  cidr_block = "172.26.0.0/16"
  public-AZ  = { a = "172.26.10.0/24", c = "172.26.11.0/24" }
  private-AZ = { a = "172.26.20.0/24", c = "172.26.21.0/24" }
  eip-NAT-AZ = ["a"]
  private-rt = ["a"]
}

リソースとモジュールの設定ファイルが作成できましたら既存リソースをインポートします。

terraform import module.terraform-vpc.aws_vpc.terraform-vpc <vpc-id>
terraform import module.terraform-vpc.aws_internet_gateway.terraform-igw <igw-id>
~~~~~~~~~~~以下同様にimport~~~~~~~~~~~

# リソースがTerraform配下に置かれているか確認
$ terraform state list
module.terraform-vpc.aws_eip.terraform-nat-eip["a"]
module.terraform-vpc.aws_internet_gateway.terraform-igw
module.terraform-vpc.aws_nat_gateway.terraform-nat["a"]
module.terraform-vpc.aws_route_table.terraform-private-rt["a"]
module.terraform-vpc.aws_route_table.terraform-public-rt
module.terraform-vpc.aws_subnet.terraform-private-subnet["a"]
module.terraform-vpc.aws_subnet.terraform-private-subnet["c"]
module.terraform-vpc.aws_subnet.terraform-public-subnet["a"]
module.terraform-vpc.aws_subnet.terraform-public-subnet["c"]
module.terraform-vpc.aws_vpc.terraform-vpc

この状態でterraform planを実行し、既存インフラとの差異がないことを確認します。

$ terraform plan

~~~~~~~~~~~~~~~~~~~~~~~~~~~~~~~~~~~~~~~~~~~~~~

No changes. Your infrastructure matches the configuration.

環境毎にリソース数が異なる場合

環境によってはコスト最適化のためだったり、冗長性の目的などでリソース数が異なるケースがあります。 弊社ではNATゲートウェイは冗長性確保のために本番環境は3台運用していますが、検証環境ではコスト最適化のために1台で運用しています。

このように環境ごとに作成するリソース数が異なりますとmoduleディレクトリ配下のリソース作成の際、動的にリソースを変更できるように工夫する必要があります。そのようなときに活用できるのhがfor_eachを使います。

for_eachによる動的なリソース作成

www.terraform.io

先程のVPCmain.tfをもう一度見てみます。

resource "aws_nat_gateway" "terraform-nat" {
  for_each      = toset(var.eip-NAT-AZ)
  allocation_id = aws_eip.terraform-nat-eip[each.key].id
  depends_on    = [aws_internet_gateway.terraform-igw]
  subnet_id     = aws_subnet.terraform-public-subnet[each.key].id
  tags = {
    Name           = "terraform-${var.Tag_Name}-nat-${each.key}"
    CmBillingGroup = "terraform:${var.Tag_Name}"
    Terraform      = "True"
  }
}

for_eachではeip-NAT-AZという変数をセットしています。この変数はリスト型の変数となっており、AZの識別子をリスト形式で格納できます。each.keyはリストのキーを参照しています。

# variables.tf
variable "eip-NAT-AZ" {
  type        = list(string)
  description = "EIPを割り当てているNATのAZ識別子"
}

検証環境と本番環境のそれぞれのvpc.tfを確認すると以下のように設定されています。

# 検証環境
module "terraform-vpc" {
  source     = "../../modules/vpc"
  eip-NAT-AZ = ["a"]

# 本番環境
module "terraform-vpc" {
  source     = "../../modules/vpc"
  eip-NAT-AZ = ["a", "c", "d"]
}

実際にNATをどのようにインポートしたのか画像を用いて說明します。

NATゲートウェイの例

VPCをインポートする時、terraform import ADDRESS IDとユーザーが設定するアドレス(module.terraform-vpc.aws_vpc.terraform-vpc)とAWS固有のリソースID(VPC-ID)でどのリソースをTerraformリソースにインポートするか指定しました。for_eachで動的に作成したTerraformリソースをインポート先に指定する場合は以下の書き方になります。

# 検証環境
$ terraform import 'module.terraform-vpc.aws_nat_gateway.terraform-nat["a"] <nat-id>' 

# 本番環境
$ terraform import 'module.terraform-vpc.aws_nat_gateway.terraform-nat["a"]' <nat-id> 
$ terraform import 'module.terraform-vpc.aws_nat_gateway.terraform-nat["c"]' <nat-id> 
$ terraform import 'module.terraform-vpc.aws_nat_gateway.terraform-nat["d"]' <nat-id> 

アドレス末尾にAZの識別子を添字として挿入し、対応したAZに存在しているNATのIDをインポート元にすることで数が異なるリソースを共通モジュールで管理することができます。

# 検証環境
module.terraform-vpc.aws_nat_gateway.terraform-nat["a"]

# 本番環境
$ terraform state list
module.terraform-vpc.aws_nat_gateway.terraform-nat["a"]
module.terraform-vpc.aws_nat_gateway.terraform-nat["c"]
module.terraform-vpc.aws_nat_gateway.terraform-nat["d"]

所感

既存AWSリソースをインポートするTerraform運用について紹介しました。すでに稼働しているAWSリソースをインポートする作業はけっこう大変なため、新規作成して置き換えられる部分はTerraformで置き換えたほうが運用が楽になると思います。弊社でもこうしてインポート作業をしていくなかで不要なリソースや新規作成しても問題無い部分についてはどんどん置き換えていきました。

まだまだIaCによるインフラ運用は始めたばかりですので、今後も最適なインフラ構成を目指せるように改善し続けていきます。

参考文献

beyondjapan.com

www.terraform.io

AWSCLIを使ってALBのリスナールールを変更するズラ!!

初めまして、キュービックでSREをやっているkmsn17です。 もうすぐGWに入りますが、みなさんはどのような休日を過ごされますでしょうか?

さてさて、GWに入る前にキュービックのテック記事について紹介します。 皆さん、インスタンスを構築する際に何を使っていますか?

僕はAWSCLIを使ってEC2を構築します。 コマンドを使って構築することで、コマンドやプログラムに対するアレルギーがなくなります。 Scriptを書いたり、プログラムを書くための基盤が身に付きます。 また、手順書を書く際にGUIだとインターフェイスの画面が変わるのでドキュメンを更新する必要がありますが、 コマンドだとその必要がなくなります。

インフラエンジニアには便利でcoolなツールです。 今回ですが、AWSCLIを使ってALBのリスナールールを構築したいと思います!! ヨッ!!Let's start!!

Target Groupの作成

実行コマンドの例

aws elbv2 create-target-group 
--name <Target Group Name> 
--protocol <Protocol Name>
--port <Port Number> 
--vpc-id <VPC ID>

実行コマンドの結果

aws elbv2 create-target-group --name kmsn17-alb-tg --protocol HTTP --port 80 --vpc-id vpc-xxxxxxxxx
{
    "TargetGroups": [
        {
            "TargetGroupArn": "arn:aws:elasticloadbalancing:ap-northeast-1:xxxxxxxxxxxx:targetgroup/kmsn17-alb-tg/xxxxxxxxxxxxx",
            "TargetGroupName": "kmsn17-alb-tg",
            "Protocol": "HTTP",
            "Port": 80,
            "VpcId": "vpc-xxxxxxxxx",
            "HealthCheckProtocol": "HTTP",
            "HealthCheckPort": "traffic-port",
            "HealthCheckEnabled": true,
            "HealthCheckIntervalSeconds": 30,
            "HealthCheckTimeoutSeconds": 5,
            "HealthyThresholdCount": 5,
            "UnhealthyThresholdCount": 2,
            "HealthCheckPath": "/",
            "Matcher": {
                "HttpCode": "200"
            },
            "TargetType": "instance",
            "ProtocolVersion": "HTTP1",
            "IpAddressType": "ipv4"
        }
    ]
}

ALBの作成

実行コマンドの例

aws elbv2 create-load-balancer 
--name  <ALB Name>
--subnets <Subnet ID> <Subnet ID>
--security-groups <SecurityGroup ID>

実行コマンドの結果

aws elbv2 create-load-balancer --name kmsn17-alb --subnets subnet-xxxxxxxxx subnet-xxxxxxxxx --security-groups sg-
{
    "LoadBalancers": [
        {
            "LoadBalancerArn": "arn:aws:elasticloadbalancing:ap-northeast-1:xxxxxxxxxxxxxxx:loadbalancer/app/kmsn17-alb/xxxxxxxxxxxx",
            "DNSName": "kmsn17-alb-xxxxxxxxxxxx.ap-northeast-1.elb.amazonaws.com",
            "CanonicalHostedZoneId": "xxxxxxxxxxxxx",
            "CreatedTime": "2022-04-13T09:14:28.760000+00:00",
            "LoadBalancerName": "kmsn17-alb",
            "Scheme": "internet-facing",
            "VpcId": "vpc-xxxxxxxxx",
            "State": {
                "Code": "provisioning"
            },
            "Type": "application",
            "AvailabilityZones": [
                {
                    "ZoneName": "ap-northeast-1c",
                    "SubnetId": "subnet-xxxxxxxxxx",
                    "LoadBalancerAddresses": []
                },
                {
                    "ZoneName": "ap-northeast-1d",
                    "SubnetId": "subnet-xxxxxxxxx",
                    "LoadBalancerAddresses": []
                }
            ],
            "SecurityGroups": [
                "sg-xxxxxxxxxxxxxxxxxxxxx"
            ],
            "IpAddressType": "ipv4"
        }
    ]
}

HTTPSのリスナーの作成

実行コマンドの例

aws elbv2 create-listener 
--load-balancer-arn <ALB arn>
--protocol <Protocol Name>
--port <Port Number> 
--certificates <Certification arn>
--default-actions Type=forward,TargetGroupArn=<TargetGroupArn>

実行コマンドの結果

aws elbv2 create-listener --load-balancer-arn arn:aws:elasticloadbalancing:ap-northeast-1:xxxxxxxxxxxxxxx:loadbalancer/app/kmsn17-alb/xxxxxxxxxxxxxx --protocol HTTPS --port 443 --certificates CertificateArn=arn:aws:acm:ap-northeast-1:xxxxxxxxxxxxxxx:certificate/xxxxxxxxxxxxxxxxx --default-actions Type=forward,TargetGroupArn=arn:aws:elasticloadbalancing:ap-northeast-1:xxxxxxxxxxxxxxx:targetgroup/kmsn17-alb-tg/xxxxxxxxxxxxxx
{
    "Listeners": [
        {
            "ListenerArn": "arn:aws:elasticloadbalancing:ap-northeast-1:xxxxxxxxxxxxxxx:listener/app/kmsn17-alb/xxxxxxxxxxxxxxxx/xxxxxxxxxxxxxxxx",
            "LoadBalancerArn": "arn:aws:elasticloadbalancing:ap-northeast-1:xxxxxxxxxxxxxxx:loadbalancer/app/kmsn17-alb/xxxxxxxxxxxxxx",
            "Port": 443,
            "Protocol": "HTTPS",
            "Certificates": [
                {
                    "CertificateArn": "arn:aws:acm:ap-northeast-1:xxxxxxxxxxxxxxx:certificate/xxxxxxxxxxxxxxxxxxxxxxxxxxxx"
                }
            ],
            "SslPolicy": "ELBSecurityPolicy-2016-08",
            "DefaultActions": [
                {
                    "Type": "forward",
                    "TargetGroupArn": "arn:aws:elasticloadbalancing:ap-northeast-1:xxxxxxxxxxxxxxx:targetgroup/kmsn17-alb-tg/xxxxxxxxxxxxxx",
                    "ForwardConfig": {
                        "TargetGroups": [
                            {
                                "TargetGroupArn": "arn:aws:elasticloadbalancing:ap-northeast-1:xxxxxxxxxxxxxxx:targetgroup/kmsn17-alb-tg/xxxxxxxxxxxxxxx",
                                "Weight": 1
                            }
                        ],
                        "TargetGroupStickinessConfig": {
                            "Enabled": false
                        }
                    }
                }
            ]
        }
    ]
}

送信元IPのルール作成

実行コマンドの例

aws elbv2 create-rule 
--listener-arn  <HTTPS Listener arn>
--priority  <Priority Number>
--conditions  <file://file name>
--actions Type=forward,TargetGroupArn= <TargetGroup Arn>

事前にファイルの作成が必要です。

[
  {
    "Field": "source-ip",
    "SourceIpConfig": {
        "Values": [
          "xxx.xxx.xxx.xxx/32"
        ]
    }
  }
]

実行コマンドの結果

aws elbv2 create-rule --listener-arn arn:aws:elasticloadbalancing:ap-northeast-1:xxxxxxxxxxxxxxx:listener/app/kmsn17-alb/xxxxxxxxxxxxxxxx/xxxxxxxxxxxxx --priority 20 --conditions file://ip-rule.js --actions Type=forward,TargetGroupArn=arn:aws:elasticloadbalancing:ap-northeast-1:xxxxxxxxxxxxxxx:targetgroup/kmsn17-alb-tg/xxxxxxxxxxxxxxxx
{
    "Rules": [
        {
            "RuleArn": "arn:aws:elasticloadbalancing:ap-northeast-1:xxxxxxxxxxxxxxx:listener-rule/app/kmsn17-alb/xxxxxxxxxxxxx/xxxxxxxxxxxxxx/xxxxxxxxxxxxx",
            "Priority": "20",
            "Conditions": [
                {
                    "Field": "source-ip",
                    "SourceIpConfig": {
                        "Values": [
                            "xxx.xxx.xxx.xxx/32"
                        ]
                    }
                }
            ],
            "Actions": [
                {
                    "Type": "forward",
                    "TargetGroupArn": "arn:aws:elasticloadbalancing:ap-northeast-1:xxxxxxxxxxxxxxx:targetgroup/kmsn17-alb-tg/xxxxxxxxxx",
                    "ForwardConfig": {
                        "TargetGroups": [
                            {
                                "TargetGroupArn": "arn:aws:elasticloadbalancing:ap-northeast-1:xxxxxxxxxxxxxxx:targetgroup/kmsn17-alb-tg/xxxxxxxxxxxx",
                                "Weight": 1
                            }
                        ],
                        "TargetGroupStickinessConfig": {
                            "Enabled": false
                        }
                    }
                }
            ],
            "IsDefault": false
        }
    ]
}

hostheaderの作成

実行コマンドの例

aws elbv2 create-rule 
--listener-arn <HTTPS Listener arn>
--priority <Priority Number>
--conditions <file://file name> 
--actions Type=forward,TargetGroupArn=<TargetGroup Arn>

事前にファイルの作成が必要です。

[
  {
      "Field": "host-header",
      "HostHeaderConfig": {
          "Values": ["hostheader名"]
      }
  }
]

実行コマンドの結果

aws elbv2 create-rule --listener-arn arn:aws:elasticloadbalancing:ap-northeast-1:xxxxxxxxxxxxxxx:listener/app/kmsn17-alb/xxxxxxxxxxxxxxxxx/xxxxxxxxxxxxxxxxxxxx --priority 10 --conditions file://hostheader.json --actions Type=forward,TargetGroupArn=arn:aws:elasticloadbalancing:ap-northeast-1:xxxxxxxxxxxxxxx:targetgroup/kmsn17-alb-tg/xxxxxxxxxxxxxxxx
{
    "Rules": [
        {
            "RuleArn": "arn:aws:elasticloadbalancing:ap-northeast-1:xxxxxxxxxxxxxxx:listener-rule/app/kmsn17-alb/xxxxxxxxxxxxx/xxxxxxxxxxxxx/xxxxxxxxxxxxx",
            "Priority": "10",
            "Conditions": [
                {
                    "Field": "host-header",
                    "Values": [
                        "xxxxxxx.cuebic-sre.work"
                    ],
                    "HostHeaderConfig": {
                        "Values": [
                            "xxxxxxx.cuebic-sre.work"
                        ]
                    }
                }
            ],
            "Actions": [
                {
                    "Type": "forward",
                    "TargetGroupArn": "arn:aws:elasticloadbalancing:ap-northeast-1:xxxxxxxxxxxxxxx:targetgroup/kmsn17-alb-tg/xxxxxxxxxxxx",
                    "ForwardConfig": {
                        "TargetGroups": [
                            {
                                "TargetGroupArn": "arn:aws:elasticloadbalancing:ap-northeast-1:xxxxxxxxxxxxxxx:targetgroup/kmsn17-alb-tg/xxxxxxxxxxx",
                                "Weight": 1
                            }
                        ],
                        "TargetGroupStickinessConfig": {
                            "Enabled": false
                        }
                    }
                }
            ],
            "IsDefault": false
        }
    ]
}

サブディレクトリの設定

実行コマンドの例

`aws elbv2 create-rule 
--listener-arn <HTTPS Listener arn>
--priority <Priority Number>
--conditions <file://file name>
--actions <file://file name> 
[
  {
      "Field": "path-pattern",
      "PathPatternConfig": {
          "Values": ["パスの設定"]
      }
  }
]

実行コマンドの結果

aws elbv2 create-rule --listener-arn arn:aws:elasticloadbalancing:ap-northeast-1:xxxxxxxxxxxxxxx:listener/app/kmsn17-alb/xxxxxxxxxxxxxx/xxxxxxxxxxxxxxd --priority 30 --conditions file://pathpatter.json --actions file://text.json
{
    "Rules": [
        {
            "RuleArn": "arn:aws:elasticloadbalancing:ap-northeast-1:xxxxxxxxxxxxxxx:listener-rule/app/kmsn17-alb/xxxxxxxxxxxxxx/xxxxxxxxxxxxxx/xxxxxxxxxxxxxx",
            "Priority": "30",
            "Conditions": [
                {
                    "Field": "path-pattern",
                    "Values": [
                        "/test"
                    ],
                    "PathPatternConfig": {
                        "Values": [
                            "/test"
                        ]
                    }
                }
            ],
            "Actions": [
                {
                    "Type": "fixed-response",
                    "FixedResponseConfig": {
                        "MessageBody": "Not Found",
                        "StatusCode": "404",
                        "ContentType": "text/plain"
                    }
                }
            ],
            "IsDefault": false
        }
    ]
}

リスナールールの変更

実行コマンドの例

aws elbv2 modify-rule 
--actions Type=forward,TargetGroupArn=<TargetGroup Arn>
--conditions Field=host-header,Values='ValueName' Field=path-pattern,Values='ValueName' 
--rule-arn <HTTPS Listener Rule arn>

実行コマンドの結果

aws elbv2 modify-rule --actions Type=forward,TargetGroupArn=arn:aws:elasticloadbalancing:ap-northeast-1:xxxxxxxxxxxxxxx:targetgroup/kmsn17-alb-tg/xxxxxxxxxx --conditions Field=host-header,Values='xxxxxxx.cuebic-sre.work' Field=path-pattern,Values='/images/*' --rule-arn arn:aws:elasticloadbalancing:ap-northeast-1:xxxxxxxxxxxxxxx:listener-rule/app/kmsn17-alb/xxxxxxxxxxxxxx/xxxxxxxxxxxxxx/xxxxxxxxxxxxxx
{
    "Rules": [
        {
            "RuleArn": "arn:aws:elasticloadbalancing:ap-northeast-1:xxxxxxxxxxxxxxx:listener-rule/app/kmsn17-alb/xxxxxxxxxxxx/xxxxxxxxxxxx/xxxxxxxxxxxxxx",
            "Priority": "30",
            "Conditions": [
                {
                    "Field": "host-header",
                    "Values": [
                        "xxxxxxx.cuebic-sre.work"
                    ],
                    "HostHeaderConfig": {
                        "Values": [
                            "xxxxxxx.cuebic-sre.work"
                        ]
                    }
                },
                {
                    "Field": "path-pattern",
                    "Values": [
                        "/images/*"
                    ],
                    "PathPatternConfig": {
                        "Values": [
                            "/images/*"
                        ]
                    }
                }
            ],
            "Actions": [
                {
                    "Type": "forward",
                    "TargetGroupArn": "arn:aws:elasticloadbalancing:ap-northeast-1:xxxxxxxxxxxxxxx:targetgroup/kmsn17-alb-tg/xxxxxxxxxxx",
                    "ForwardConfig": {
                        "TargetGroups": [
                            {
                                "TargetGroupArn": "arn:aws:elasticloadbalancing:ap-northeast-1:xxxxxxxxxxxxxxx:targetgroup/kmsn17-alb-tg/xxxxxxxxxxx",
                                "Weight": 1
                            }
                        ],
                        "TargetGroupStickinessConfig": {
                            "Enabled": false
                        }
                    }
                }
            ],
            "IsDefault": false
        }
    ]
}

ルールの優先順位の変更

実行コマンドの例

aws elbv2 set-rule-priorities 
--rule-priorities RuleArn=<HTTPS Listener Rule arn>,Priority=<Priority Number>

実行コマンドの結果

aws elbv2 set-rule-priorities --rule-priorities RuleArn=arn:aws:elasticloadbalancing:ap-northeast-1:xxxxxxxxxxxxxxx:listener-rule/app/kmsn17-alb/xxxxxxxxxxxxxx/xxxxxxxxxxxxxx/xxxxxxxxxxxxxx,Priority=1
{
    "Rules": [
        {
            "RuleArn": "arn:aws:elasticloadbalancing:ap-northeast-1:xxxxxxxxxxxxxxx:listener-rule/app/kmsn17-alb/xxxxxxxxxxx/xxxxxxxxxxx/xxxxxxxxxxx",
            "Priority": "1",
            "Conditions": [
                {
                    "Field": "source-ip",
                    "SourceIpConfig": {
                        "Values": [
                            "192.168.132.1/32"
                        ]
                    }
                }
            ],
            "Actions": [
                {
                    "Type": "forward",
                    "TargetGroupArn": "arn:aws:elasticloadbalancing:ap-northeast-1:xxxxxxxxxxxxxxx:targetgroup/kmsn17-alb-tg/xxxxxxxxxxx",
                    "ForwardConfig": {
                        "TargetGroups": [
                            {
                                "TargetGroupArn": "arn:aws:elasticloadbalancing:ap-northeast-1:xxxxxxxxxxxxxxx:targetgroup/kmsn17-alb-tg/xxxxxxxxxxxx",
                                "Weight": 1
                            }
                        ],
                        "TargetGroupStickinessConfig": {
                            "Enabled": false
                        }
                    }
                }
            ],
            "IsDefault": false
        }
    ]
}

ルールの削除

実行コマンドの例

aws elbv2 delete-rule 
--rule-arn <HTTPS Listener Rule arn>

実行コマンドの結果

aws elbv2 delete-rule 
--rule-arn arn:aws:elasticloadbalancing:ap-northeast-1:xxxxxxxxxxxxxx:listener-rule/app/kmsn17-alb/xxxxxxxxxxx/xxxxxxxxxxx/xxxxxxxxxxx

所感

AWSCLIについて紹介しましたが、いかがでしたでしょうか?

僕も、元々コマンドが苦手でしたが今はALB構成のEC2構築、データ同期をScript化して自動構築したり、 Ansible、Terraformを使ってWebサーバの設定変更などを書いたりして、苦手意識がなくなり大変ご立派になってきました。笑

みなさんも、是非ゴリゴリにトライしてコマンドアレルギーをなくしましょう! それでは素敵なGWをお過ごしください。

参考文献

docs.aws.amazon.com

blog.serverworks.co.jp

qiita.com

dev.classmethod.jp

cloud5.jp